Like close fingering, open fingering is based on chord pattern one. Pattern one is the first inversion of a chord, the first of three different ways to play each chord. Pattern one is formed with the thumb playing the root note of the chord and the other fingers playing higher notes of the chord.
In this tutorial, pattern one is used to play chords G, G7 and Am with the left hand. Also, pattern one is the only pattern used by the right hand to play chords and notes in harmony with chords played by the left hand. Unlike the right hand, the left hand also uses chord patterns two, three and four. Pattern four is pattern one with a fourth note added, the 7th note. So, for example, when chord C is played with pattern four, it is chord C7.
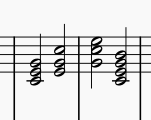
This is how different inversions of any chord are notated, written on a staff.
The first inversion there is pattern one. Add a 'B' note on top of that triad to make it pattern 4. The last inversion on the drawing is pattern 4.
The lowest note of the first inversion tells which chord it is. So that chord in the drawing is chord C because the lowest note is C, the root or tonic note of chord C. Any inversion three has the tonic note at the top and any inversion two has the tonic between the other two notes.
In the key of C, chord C is played by the right hand with the thumb on note C, the pointer on E, the middle finger not on any note, the fourth finger on G and the little finger on note B.
Play chord C with the right hand using pattern 4. Hold the fingers in that position then close the thumb in to touch note D and the little finger in to touch note A. Now you have the D pattern used for close fingering. See how it is based on pattern one.
Practise playing chord C with the right hand using pattern one or four. The thumb goes on note C, the pointer on E, fourth finger on G and little finger on B. The middle finger does not play any note here.
Hold the fingers in the same position and jump them all together up one key tone to play chord Dm with pattern four. The thumb is now on note D.
Practise changing back and forward from chord C to Dm.
Beginners can practise the jump as an easy crossover of the thumb from one key to the key beside it, followed by the other fingers.
Think of the piano keys in any octave, eight notes, as being numbered one to seven. The root note of any chord played by the right hand with the fourth pattern is played with the thumb, that is finger 1 or T. The next note in any chord is played on key three, the next on key five and the next on key seven.
Keep the fingers set in that same pattern to play another chord in the key of C by putting the thumb on the root note of that chord, the pointer on the third note, the middle finger off the keys, the fourth finger on the fifth note and the little finger on the seventh note.
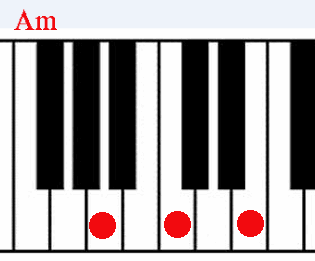
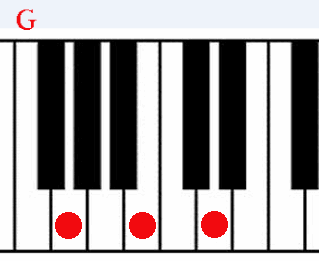
Both the left and the right hand play chords Am, G and G7 using pattern 1 or 4. But they play them with different fingers. The left hand uses fingers 5, 2 and 1 but the right hand uses fingers 1, 2, 4 and 5.
Play these triads A and G with the right hand and fingers 1, 2, 4 and play the cut G7 with 1, 2 and 5.
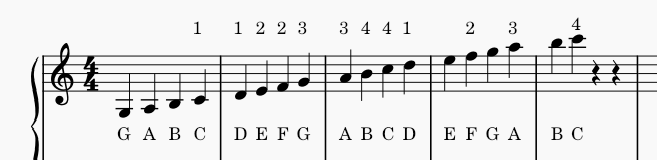
This drawing names all the notes on a staff, A to G, and numbers the notes of two chords, 1 to 4. The two chords are C and Dm.
With your fingers in the pattern four, put the thumb on the note C below middle C. Put the second finger on note E, the fourth on G and the fifth on B.
Jump pattern four up one tone from C to chord D. Now the thumb is on note D.
Practise playing chords C and Dm over and over with pattern 4.
The first chord in the drawing above is C. The thumb here goes on the C an octave below middle C. The other fingers 2, 4 and 5 cover every second note after C. The next chord is Dm. The thumb goes on note D and the other fingers 2, 4 and 5 cover every second note after D. That same finger pattern plays all the main chords in the keys of C and Am and most of the main chords in many other popular keys. The next chord on the drawing is Dm again but played an octave higher. Cross the thumb over the little finger to move up to the higher note D. The last chord is C played by jumping pattern 4 back a tone, although it is not numbered on the drawing.
That progression of chords is C, Dm and C. Say that C is played for the first bar or measure, Dm for the second, Dm an octave higher for the third bar, and higher C chord for the last bar.
Play other chords in the key of C using pattern four with the thumb on the root note of whatever the chord is. The other main chords are Em, F, G7, Am and Bflat. With pattern four, the thumb plays note Bflat. The same pattern plays both major and minor chords. Sharps and flats, black keys, are usually played with fingers 2, 3 and 4 because those fingers reach further. Sharps and flats of a note are usually played with the same finger that plays the natural of that note. But Gsharp and Dsharp are played with the 2nd finger, the pointer instead of the thumb, and Dflat and Aflat are played with the fourth finger instead of the little finger. In this book a hash # is used for a sharp sign and a b for the flat sign, as in C# and Bb.
When practising, play each chord with four fingers. That exercises the little finger more.
Moving fingers in pattern four from one chord position to another can be done with a jump or a crossover.
Practise jumping with the right hand from chord C to Dm and back. Then from EM to F and back. Then from AM to G and back and forward and so on.
Only jump one note higher or lower. To move the pattern more than one note, use a finger crossover.
Move from chord C to chord Em by crossing the thumb under the pointer finger then pivoting with the thumb on note E to reform pattern four. Play back and forward from chords Em to C. That is called a T to 2 crossover of thumb to second finger.
Practise the same thumb crossover to shift pattern four back and forward between chords EM and G, Am and C, C and Em, F and Am and Dm and F.
At first, look at the keyboard as you practise these moves. This puts a picture of the move into your memory. Then practise the moves without looking at the keyboard, as you would if you were learning to touch type.
Practise moving from chord Dminor to chord Bflat, Gm to Bb, and back and forward. Play note Bb with the thumb. Chord Bflat can usually be played instead of chords B and Bminor. Play chord B with either hand in the first position by putting the thumb on note B, the pointer on D sharp and the fourth finger on C sharp.
Practise moving from C to Bb and back by playing the Bb chord differently, this way. Jump the thumb from note C to note D instead of to note Bb, with the pointer on note E and the fourth finger on Bb.
Here is how to move from chord C to chord F higher up the keyboard. Move pattern four from chord C to chord F by crossing the thumb under the pointer to play note F. Move back from F to C by crossing the fourth finger over to note G. Play back and forward between chords C and F. That is called the T over 2 crossover.
Crossover the same way to move from chord Dm to higher chord G and back and from EM to Am and back.
Practise jumping pattern four from chord F to Gminor, Gm. The pointer plays note Bflat, Bb.
When you play a black key, like Bb, play it with the pointer, middle or fourth finger whenever you can.
Practice moving from chord F played higher on the keyboard down to chord G played lower. From chord F, cross the little finger over the thumb to play note G and form finger pattern one for the rest of the chord G.
Move pattern four up and down an actave by crossing the thumb over the little finger. So to move from chord C to chord C one octave higher, cross the thumb under the little finger to reach the higher note C. To move back an octave, cross the little finger under the other fingers to reach the lower note C. That is called the T over 5 crossover.
Practise that octave crossover with other chords.
So there are three ways to move pattern four from one chord to another: jump, T to 2 and T over 2. Another crossover called T over 5 is to move a chord up or down an octave.
Learn to jump and crossover smoothly without looking at the keyboard.
Open fingering like that is good for playing accompaniments, melodies, improvisations and instrumentals. It is good for blues improvisations because the little finger stays over the high 7th note while the thumb is beside the deep 7th note, and the pointer can flatten the third note. Close fingering is good for sight reading and playing melodies. It is also good for playing single motes to accompany chords played by the left hand.
Listen here to some recordings of music played with the fingering technigues taught in this book:
Record music
