 Pattern 2
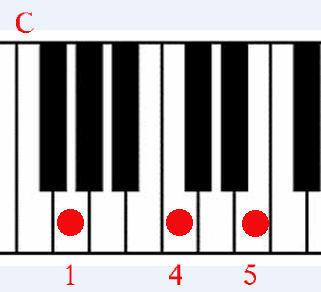
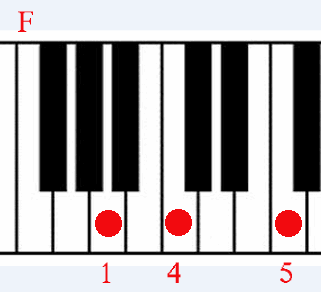
 Pattern 3
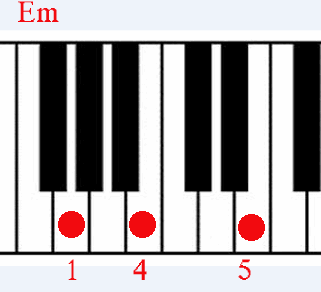
 Pattern 4
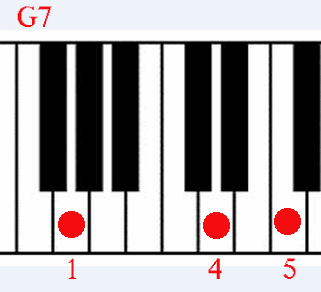
Piano accompaniment is harmonising. This is an outline of a piano playing method for accompanying a singer or other instruments.
It also teaches how to move from one chord to another through a progression of chords.
With this technique, both the left and and the right hand play chords. The left plays block chords, three or four bass notes all together at the same time, while the right plays higher notes of the chords one after another.
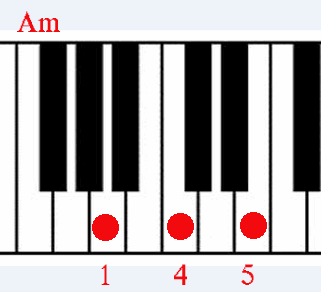
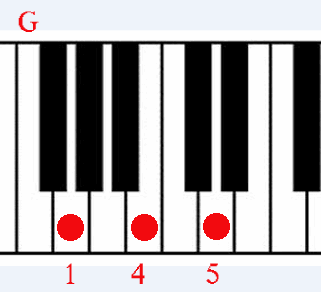
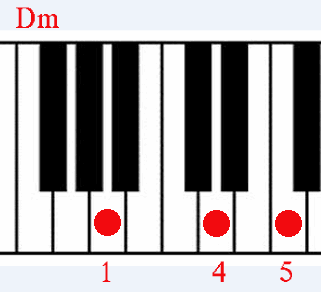
There are three ways to play any chord. You can play a chord using finger pattern one, two or three. Each chord or triad can be played with three fingers. This book also talks about pattern 4, which is just pattern one with a fourth note. Here are examples of fingering with the four patterns, with the little finger numbered 1, the pointer 4 and the thumb 5.
Pattern 1
Pattern 2
Pattern 3
Pattern 4
See the chord chart in this book for which fingering to use for which chord.
Practise playing each chord with the same fingering each time.
This book teaches the most efficient way overall to play each chord in relationship to all the other chords in the same key. The left hand plays triads G and Am with pattern one; Bflat, C and Dm with pattern 2; Em and F with pattern 3; and G7 with pattern 4. The right hand plays all chords with pattern 4.
Block chords are played in a set area of the keyboard below middle C, using finger patterns 1,2,3 and 4. Notes played with the right hand follow pattern 1 and 4 only. This is really only three patterns as 4 is 1 with a 7th note added. The patterns are otherwise known as the root, first and second inversions of any chord.
The right hand plays these open patterns in harmony with the block chords and does not play the closed pattern used for playing melodies, the closed pattern for D and G having been explained earlier.
Playing chords in the key of C, the right hand plays chord C near the middle of the other chords, usually starting at note middle C. Chords A and B are played starting lower on the keyboard than chord C, to the left of it. Chords D, E. F and G are played higher than chord C, to the right.
In moving from one chord to another, the thumb leads when moving to the right and the 4th finger leads when moving to the left. So the thumb, that is the first finger, leads when moving from chord C to chords Dm, Em, F and G. The 4th finger leads when moving from chord C to chords Bflat a Am. While learning this technique, it may be easier to leave the thumb off note Bflat.
Moving to the right, the thumb goes from the root note of one chord to the root note of the next chord. Moving to the left, the 4th finger moves from the 5th note of one chord to the 5th of the next. The fifth note is also known as the fifth interval. The thumb and 4th finger often move by crossing over another finger. The other fingers just fall into place to form pattern four.
The 5th note of each chord needs to be remembered. The position of the 5th note on the keyboard needs to be seen in the minds eye in relationship to the position of the root note. Watching and learning the active relationship between the root note and the 5th note in any change of chords is the essence of this technique.
The fifth note of chord C is note G, the 5th note of D is A, the 5th of E is B, F is C, G is D, A is E and B is F. The fourth finger plays the fifth note. To move from chord C to chord F, for example, the thumb finds the root note, F, beside the 5th finger. To move from chord F to chord C, the 4th finger finds the fifth note, C, beside the thumb. To move from F to Am, the 4th finger finds the note E next to the thumb.
Moving to the right, cross the thumb over, under or on to the 4th finger to reach the next chord. Moving to the left, cross the 4th finger over, under or on to the thumb to reach the next chord. As the thumb crosses the 4th finger, the 4th moves on to play the 5th note of the next chord. As the 4th finger crosses the thumb, the thumb moves on to play the root note of the next chord.
Left handed block chords need to be learned and practised separately from the right handed chord notes before playing both left and right together. Then as this technique is practised, it soon becomes apparent that the number of crossover moves from any chord to another is few and that the cossovers are easy to learn and play.
The thumb need not always be positioned in relationship to the 4th finger. Often with changes to closer chords, the thumb can be seen in relationship to the second finger instead. While learning, it helps to remember that the second finger is two notes higher than the thumb. So the second note in the chord is two notes higher than the root note. The second note referred to here is also known as the third interval, basic triad chords being made of the first, third and fifth note interval.
Seeing in the minds eye a relationship between two finger positions helps with moving from one chord to the next without looking at the keyboard. It helps teach the fingers to feel their way along the keyboard, relying on muscle memory and not eye sight. For example, to move from chord C to chord Am, the 4th finger finds the 5th note, E, under the second finger. To move from F to G, the thumb finds note G next to note F.
Moving from chord Am to chord G is an exception to the technique. Instead of crossing the thumb over to play the note G under the little finger for the higher G chord, play the lower G chord instead. Just jump the A chord one note to the left to play the G chord, the same as jumping one to the left for the block chords Am and G. This move is practical because G chord usually leads only to C chord.
In moving from chord Dm to Em and back, a temporary chord called Em7 is used. The left-hand fingering for chord Em7 is the little finger on on note G and the thumb on E, as with the usual chord Em, but with the pointer playing note D, which is the seventh integer of Em and the root of Dm. Pivot on key D to move from Dm to Em. Move the pointer to key D while you are playing Em then pivot on D to move back to Dm. To changer from Em or Em7 to G7 cut, move the thumb from note E to note F. If time allows, Em can be changed to Em7 or the other way around by moving the pointer finger.
When moving from G7 to Em, the fingering for Em is 5, 4, T not 5, 2, T. This is because it is easier just to lift the pointer finger and play note E with the thumb.
Chord G and G7 are interchangeable although which one is played depends upon which other chords are before and after it. Chord G is easier with chords Am, Em and C. Chord G7 is easier with chords Dm, F and B flat. G7 is used after chord F to come back to chord C. G can be played with fingers 5, 2 and T. G7 is played with fingers 5, 4, 2 and T. Playing any three notes of G7 is enough, whichever is easier. G7 is played with the same keyboard pattern as G but with the seventh note added. With sight reading, sheet music should be marked with pencil to show whether G or G7 should be played. For example, G is marked when moving from Am to G then C, but G7 is marked when moving from Am to G7 then Dm.
Sometimes a chord may be cut from three notes to two for brisker playing. For example, cutting a chord which follows Em may help, as in the following progressions: -
F Bb Em7cut Fcut Fcut can be like Dm without the D note.
C Em Bbcut Note D can also be cut out of chord Bflat.
Em G7 Dmcut Dmcut can be Dm without the D note also.
Here are some other examples of chord changes from key of C which may be unfamiliar or awkward to play, although each of the following chords can be played with three fingers: -
Am Bb Em7 G7cut
F Bb Em7cut G7 Dm The little finger of the left hand plays note G in both Em and G7.
C Bb Em7cut Bb Dm
Practise changing from Em and Em7cut to G7 played with four fingers. The 5th finger anchors on note G. Practise changing from Am to G7 played with four fingers. The little finger, the 5th, jumps back to note G and anchors there to play the G7.
Remember that all left-hand chords are usually played within the limit of keys G to F below middle C.
When changing from chord Dm to Em and back to Dm, just keep to pattern two and move out of limits. When changing from chord Em to Dm and back to Em, just keep to pattern three and move out of limits. A number 2 or 3 can be marked on the sheet music to show which finger pattern to use.
Practise and remember rare or awkward chord changes like those above so that they can be instantly recognised on the sheet music and played without hesitation.
Chords rarely need to be cut to two notes. To avoid confusion and hesitation, the fingering of a rare cut chord should follow that of the uncut chord.
Solo playing to accompany yourself singing often needs to be simple and easy. To accompany yourself on piano while singing, it helps to play with a simple style of fingering. Here is a summary of the simple piano style outlined above.
Songs here are played in the key of C.
The chords used are: C, Dm, Em and Em7, F, G7, Am and Bflat.
Play chord Bb instead of B or Bm.
All left-hand chords are played within the limit of keys G to F below middle C.
Chords C and Dm are played with the 2nd finger patter, that is otherwise known as the 1st inversion. Chords Am and Bb are played with the first pattern. Chords F and Em are played with the 3rd pattern. Em7 is played with the 1st pattern in the middle of two octaves. Chord G7 is played with the 4th pattern, that is pattern one with the 7th note added.
After playing G7 and G within the limit has been practrised thoroughly, playing G1 with F1 or F3 with G3 may be an easy alternative in some chord progressions.
Em7 is played only before or after chords Dm and Bflat. Chords Dm and Bb fit easily with the other chords.
Em is played with the other chords.
Sometimes Em7 should be changed to Em to fit the next chord. For example when playing Bb, Em7, Em, F.
G7 can be played with all the other chords listed above. G7 is needed before and after Dm, Bb and F. Chord G, played with pattern one, may be played as an alternative to G7 with Am, C and Em.
The eight chords listed above are played instead of any other version of a cord by the same letter. For example, Em is played instead of Eflat, Dm is played instead of D and G7 is played instead of Gm6. The eight chords played instead still sound melodic because they are the main chords belong to the key of C.
G7 is a bridge which links the other chords as a whole. It may be cut to three notes to fit a chord before or after it. It may be cut or changed to chord G as an alternative.
Learners can play with the right hand the root note of any chord being played with the left hand. Fingers of the right hand stay over keys D, E, F, G and A, just above middle C. The thumb plays notes C and D. Note D can be played instead of B for chord Bb. This position anchors the right hand ready to play other notes in accompaniment.
Later learn to play all chords with the right hand using pattern four; fingers 1, 2, 3, 4, with the thumb being 1.
